Advanced
Welcome to Metaphor’s advanced usage page. This page covers some different aspects of Metaphor and Snakemake, how you can customise your workflow and a more detailed explanation of modules.
How Snakemake works
The best thing you can do to get the hang of Metaphor is to learn more about Snakemake. Snakemake is a scientific workflow management system which serves as the engine for Metaphor. There are many resources to learn Snakemake, such as:
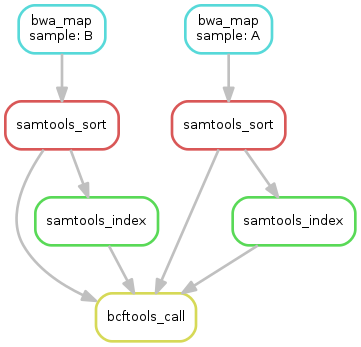
and many others. The way Snakemake works is that you tell it which files you want to generate at the end of your workflow, and it calculates a DAG (directed acyclic graphic) to determine which programs must be executed and which files must be generated to get there:
Snakemake depends on three main artifacts to do this:
the Snakefile, where the workflow itself is defined, that is, each computing step (called a rule), the input and output files, and the program to be executed;
a config YAML, where the workflow settings are defined. This file is used to set different parameters and options that will be used throughout the workflow;
the input file(s), which will provide the entrypoint for the workflow, that is, the first file(s) to be used as input. For Metaphor, this is provided as a tabular file (CSV or TSV) containing the sample names and path to the reads.
Although only the Snakefile is mandatory, most Snakemake workflows will also require a config file and an input file. Once you understand how Snakemake works, everything starts to make more sense, and it’s easier to identify problems and to customise the workflow to your own wants and needs. To achieve full control of how Metaphor works, you can run it manually with Snakemake.
Running manually
Usually, Snakemake workflow are called with the snakemake command. However, you may have noticed that Metaphor has its
own CLI, with the metaphor command. This command was created to make simple executions of Metaphor easier, so the user
doens’t need to have any Snakemake experience. More advanced users, however, may want to run the workflow using the
Snakemake command so they can provide specific options. To support this, Metaphor provides the metaphor config show
command, that can be used to access the Metaphor Snakefile and configuration files:
(metaphor)$ metaphor config show

Metaphor path:  /home/user/path/to/metaphor
Snakefile:      /home/user/path/to/metaphor/workflow/Snakefile
Test config:    /home/user/path/to/metaphor/config/test-config.yaml
Default config: /home/user/path/to/metaphor/config/default-config.yaml
Example input:  /home/user/path/to/metaphor/config/samples.csv
Without any args, the config show command prints all files. You can use this to see where Metaphor is installed in
your system. However, you can pass arguments to the command to print the location of a specific file:
(metaphor)$ metaphor config show --snakefile

/home/user/path/to/metaphor/workflow/Snakefile
You can then use this feature to run Metaphor manually with the Snakemake command, by using a subshell command:
(metaphor)$ snakemake --snakefile $(metaphor config show --snakefile)               \
                      --configfile $(metaphor config show --default-config)         \
                      --config samples=$(metaphor config show --example-input)      \
                      [...]
This provides greater flexibility when running Metaphor, as you can use the Snakemake command directly, if you so prefer.
Input and config files
As described in the Tutorial, Metaphor provides the metaphor config input command that allows you to
generate the tabular input file that is the workflow’s entrypoint. This is probably the most effortless way to generate
your input file. However, to get it to work, make sure that your files are named as such:
sample_a_R1.fq.gz   sample_b_R1.fq.gz
sample_a_R2.fq.gz   sample_b_R2.fq.gz
That is, make sure that your forward and reverse files share the same file name, and are differentiated just by the
_R1 and _R2 suffixes. If the files deviate too much from this format, it is likely that the command will not be able
to identify them. If that is the case, you will have to write your file manually. Doing this is not hard, just make sure
that your file has:
a
sample_namecolumn with unique identifiers for each sample;the
R1andR2columns with the full path to the forward and reverse files, respectively;it is a plain text, tab-delimited file, preferably a CSV or TSV. A xlsx will not work.
For the R1 and R2 files, the relative path may also be used, but the files must be found in relation to
where the workflow is being run, so the full path is more errorproof.
There are more columns that you can add to your input file:
A
unit_namecolumn can be added to specify multiple files for the same sample. Sometimes when sequencing libraries are very big, they can be divided into multiple files. You can specify this column so Metaphor will treat separate files as the same samples. During the workflow, they will be concatenated together (this can be configured by the configmerge_readsparameter. For example:
|
|
|
|
|---|---|---|---|
|
|
|
|
|
|
|
|
|
|
|
|
|
|
|
|
A
groupcolumn can be added to define assembly and binning groups. This is specially useful if you are analysing independent datasets. You don’t have to run Metaphor multiple times; rather, you can just set each of your datasets as a group and run the workflow once for all datasets. See the following section for details.A
metaquast_referencecolumn can be added to each row to specify MetaQuast reference files for each sample. MetaQuast is a program to evaluate and compare metagenome assemblies against a reference database. Although it’s disabled by default in Metaphor, if you have reference assemblies, such as a list of reference genomes or an assembled metagenome, you can use that as a reference to evaluate your Metaphor-generated assembly against it. Just add themetaquast_referencecolumn with the full path to the assembly FASTA file and activate themetaquastparameter in the config and Metaphor will run MetaQuast on your samples. You can also provide a single reference for all samples (specially relevant in the case of coassembly) in the configmetaquast:coassembly_referenceparameter.
These is pretty much all there is to know about your input file. If you run Metaphor directly with
metaphor execute -i, on a directory of FASTQ files, it will attempt to generate an input file with the
metaphor config input command. If your files are not formatted like described above, however, it is likely that it
will not work. In that case, generate your file manually like described here.
Generating the configuration file is simpler than the input file. It is highly recommended that you generate it using
the metaphor config settings command. That launches an interactive prompt that is used to set the desired config
values. If you find it hard to use, you can also copy the default configuration file to your current directory:
(metaphor)$ cp $(metaphor config show --default-config) .
You can then edit the file to your liking. You’ll notice that this file has explanatory comments throughout. If you
generate the config with the metaphor config settings command, you won’t have any comments, but you can find a
description of each configuration value in the Configuration page of this documentation.
Cores and memory
Most Snakemake workflows will have specific settings for resources that will be required from the machine.
There are three main resources in Snakemake: mem_mb, disk_mb, and tmpdir. The
Snakemake docs have a detailed explanation on how these resource settings work.
Metaphor’s main memory setting is max_mb, which defines the maximum RAM (in megabytes) to be used by the workflow. There is an additional setting, scheduler, which should be set to True if the workflow is being run on a scheduler, such as SLURM, PBS, HTCondor, etc/
max_mb defines the maximum amount of memory to be requested by the workflow, i.e. it should be under your machine’s RAM limit. When scheduler is set to True, this will be the memory requested from each node.
The max_mb setting is used by rules that are memory intensive but run on one or few cores, through the get_max_mb function
defined in the common.smk
module. This function has a margin argument which defines how much of the max_mb should the rule use. The default
value for margin is 0.2, which means the rule will use 80% of what’s defined in max_mb.
Assembly and binning
An advantage of Metaphor is its flexibility in terms of assembly and binning of samples. To put it simply, there are two different strategies to conduct this: individual and pooled (named coassembly/cobinning in the Metaphor config YAML file). These mean the same thing for both assembly and binning (“AB” hereafter). In the first strategy, samples are assembled (or binned) individually, and don’t use data from other samples to inform the AB process. In the second strategy, all samples (or samples from a specific group) are pooled together, that is, they use data from other samples to both assemble and bin the contigs together. That can be useful if the grouped metagenomes are sourced from the same (or very similar) environments.
Metaphor’s default strategy is to perform individual assembly and cobinning. Each sample is assembled individually, then contigs from all samples are concatenated into a contig catalogue. Samples are individually mapped to that contig catalogue and the mapping data is used for binning. However, you can also perform individual assembly and individual binning. In that case, the contig catalogue will only contain contigs from that one sample.
An alternative is to perform coassembly. Coassembly can be done for all samples, or they can be divided into
“groups”. In both cases, the reads of samples that will be coassembled are used as input to the assembler (rather
than only a single sample). You can specify assembly groups for your samples by adding a group column to your
input CSV (see previous section). If coassembly is activated and you don’t specify any groups, all samples
will be assembled together in a group called “coassembly”. The same goes for binning.
You can also use the group column to differentiate binning groups, even if you are assembling samples individually.
Let’s say you have some samples from environment A and B and you’d like to perform individual assembly,
but cobinning for both environments. You can simply set your group column with the A and B labels, and
leave the coassembly setting off in the config.
All of these differences can be confusing. Let’s summarise how to put each of them in practice, in terms of how to set up the Metaphor config:
Individual assembly, individual binning (sasb)
You want to assemble and bin each sample individually:
coassembly: Falsecobinning: FalseLeave
groupcolumn blank.
Individual assembly, cobinning (one group) (sacb)
You want to assemble each sample individually and bin all of them together into a single group:
coassembly: Falsecobinning: True(default setting)groupcolumn doesn’t matter.
Individidual assembly, bin by groups (sagb)
You want to assemble each sample individually and bin them by groups:
coassembly: Falsecobinning: Falsegroupcolumn with desired binning groups.
Coassembly, bin by groups (gagb)
You want to assemble the samples by groups, and also bin them as so:
coassembly: Truecobinning: Falsegroupcolumn with desired assembly groups, that will be also used for binning.
Coassembly, cobinning (gacb)
You want to assemble the samples by groups, but bin them into a single group:
coassebly: Truecobinning: Truegroupcolumn with desired assembly groups, that will NOT be used for binning (rather a single binning group will be used).
Coassembly, cobinning, one group for both (cacb)
coassembly: Truecobinning: Truegroupcolumn blank.
Package structure
Although Metaphor is a Snakemake workflow, it is packaged as a Python application. There are three subpackages in Metaphor:
cli, that defines themetaphorcommand and CLI;config, that contains the default configuration files and their paths;workflow, which is the main subpackage containing the workflow logic and Snakefile.
The first subpackage is a simple CLI application based on the Python
argparse module, and consumes values from the other two.
The config subpackage is the smallest of the three, containing only the default and test configuration YAML files, and
a sample input file that serves as example. The latter one contains all of the workflow logic. Let’s take a closer
look at it:
$ tree metaphor/workflow -L 1
metaphor/workflow
├── Snakefile
├── __init__.py
├── envs
├── report
├── rules
├── schemas
└── scripts

6 directories, 2 files
The workflow is structured in accordance with the Snakemake recommended best practices.
Metaphor’s Snakefile is very simple. Basically, it imports all of the Metaphor rules (defined in separate .smk
files for each module) and requires a single rule all which will require the final output to be produced.